Wednesday, 2 July 2014

The 7 Deadly Sins Tag

1. GREED: What is your most inexpensive beauty item? What is your most expensive?
My most inexpensive item has to be my MUA Undress Me Too eyeshadow palette, a swatch of several colours cost only £4. My most expensive item is definitely my Benefit They're Real mascara, it cost £19.50 but is most definitely my favourite beauty product. 

2. WRATH: What beauty products do you have a love/hate relationship with? What product has been the hardest to get?
I have a love/hate relationship with eyeshadow sometimes it turns of how I want and other times I end up looking like I've been punched. The product which has always been hardest to get is foundation, I went through a stage where every foundation I brought got discontinued, which was bloody annoying. 

3. GLUTTONY: What are your most delicious beauty products?
I'm between two, these being Lush Lip Scrub in Bubblegum and Maybelliene Baby Lips in Pink Punch, these products smell amazing and taste pretty good too. 
 
4. SLOTH: What beauty product do you neglect, due to laziness?
I'm so lazy when it comes to my lips, I'll start off by applying the lipstick or balm but then through the rest of the day I forget to reapply, oops. 

5. PRIDE: What beauty product gives you the most self confidence?
I don't know about self confidence, but the beauty product which makes me feel my best and I feel lost without is my Benefit Hoola bronzer, fabulous for contouring, it is my pride and joy. 
 
6. LUST: What attributes do you find most attractive in the opposite sex?
Probably a good sense of humour, whether it's me making them laugh or them making me laugh and LEGS!!! Good legs are my weakness. 

7. ENVY: What items would you most like to receive as a gift?
I would love to receive more Benefit products, if anyone handed me a massive basket of Benefit makeup there is no way I'd reject the offer.

If there are anymore tags which you think I should do, feel free to leave them in the comments below. If anyone else has done/or going to do this tag I'd love to take a look so feel free to leave your link in the comments. Thanks for reading :-)

Also follow me on:
- Instagram - @perksofgemma_
- Twitter - @Gemm96
I promise to follow back :-)

Monday, 30 June 2014

Beauty Products: My Daily Face

Hi everyone! I've noticed that my beauty product favourites post from ages ago had a good audience, so in today's post I'm going to go through my daily face, i.e, the foundation I use and how I finish my look. So please stay with me as I go through my routine.

Tools:
I am completely and 100% a lover of Real Techniques brushes, these brushes can be brought pretty much anywhere and although more expensive than some brands, they are worth every penny. For my daily face routine I use:
- Stippling brush (pictured in the middle) - this brush is particularly suited to liquid foundation, it's flat surface allows for an even coverage and easy blending. I find using this brush blending outwards and in a circular motion gives me a more flawless finish.


- Powder brush (pictured on the left) - this large brush works well with both loose and pressed powder. I use this for a pressed powder and find that there is not too much residue left on your face, avoiding looking "cakey" and unnatural.
- Small pointed foundation brush (pictured on the right) - as a foundation brush it is too small for me personally, so I use this brush to apply my concealer as it is pointed and allows you to cover awkward blemishes.

Foundation:
I have gone through many foundations and have never been able to find one which I am completely happy with. So recently I read up on Rimmel Perfect Match Foundation and purchased it in the colour Ivory and so far, so good. It is a light liquid foundation and easy to apply and blends well, it is enhanced with Sapphire Radiance, which means it gives a dewy glow to your skin, something which I am pleased with. When choosing in the shop I was in between this foundation and Rimmel Wake Me Up, however I felt that the glittery tint in the Wake Me Up foundation was something I personally wasn't sure would work well with me, as I didn't want to sparkle like something out of Twilight. I have normal skin, which tends to become oily as the day goes on, however this foundation lasts all day for me and I have no complaints.

The add-ons:


These may be add-ons but they are most certainly essential to completing the daily face, my personal favourites are:
- Collection 2000 Lasting Perfection Concealer - this concealer is easily applied and when covering my blemishes and dark circles under my eyes it does wonders for me. It is important to choose a colour which works well with your foundation as you want to avoid uneven skin tones.
- Rimmel Stay Matte Pressed Powder - this powder has been a miracle worker for me. It is perfect for all skin types, as it is fragrance and oil free, meaning it does not leave pores clogged and gives a natural finish to the daily routine of makeup. A product that proves it lives up to it's hype.

Thank you for reading and I hope this was helpful as a guidance to my daily face. For my other favourite beauty products, which I also use in my daily routine, check out my Beauty Favourites post. If you have any questions please feel free to leave them in the comment section and I will happily reply.

Follow me on:
- Instagram - @perksofgemma_
- Twitter - @Gemm96
I promise to follow back :-)

Wednesday, 18 June 2014

Film Review: The Fault In Our Stars


So last Thursday night, I was very lucky to go to the exclusive "feel it first" screening of The Fault In Our Stars. I cannot express how emotional this film had me. In this blog post, I'm going to review the film from my point of view having already read the book (promising not to give any spoilers)

Review
As we all say the film never lives up to the book, but this film is one of those which, in my eyes, manages to capture John Green's The Fault In Our Stars raw and heart wrenching, yet emotionally rewarding story. Credit has to be given to director, Josh Boone, who you can tell worked so hard to make sure the film was in every bit as magical as it rightly should be. Leading cast members, Ansel Elgort and Shailene Woodley employ the souls of their characters into their hearts. One actor who also stands out in particular, is Nat Wolff (Issac) who brings comedy into the film and also a heartwarming, yet heartbreaking moment, between his friendship with Augustus and Hazel.

The plot of the film is very true to the book, although be warned some details are missing, this does not hinder the film and the overall adaption. It is cleverly directed so that you know what each character is feeling, again bringing you close to each character. 

I must say that when I seen the film, it was so sweet to know everyone felt the same emotions and despite being strangers, you felt yourself laughing, smiling and crying together as an audience of this highly anticipated film. I personally sobbed at this film, bearing in mind I cry at pretty much anything. So I highly recommend taking a box/packet of tissues and snacks for comfort eating.
There is certainly no magic lost from this adaption, Hazel and Augustus' love story becomes an emotional rollercoaster from the big screen.

This has easily became my favourite film to match the book being my favourite read. My review of the book, can be found in my previous blog posts, which gives a bit more insight into the book (no spoilers I promise). Thanks for reading and stay posted for more blog posts :-)

Follow me on:
Instagram - @perksofgemma_
Twitter - @Gemm96
I promise to follow back :-)

Wednesday, 21 May 2014

Film review: The Breakfast Club

Well, it's nearly been a month since I last posted, oops. Exams literally took over but now I'm free I'm going to try and be more regular with my posts, well hopefully. In this blog post, I'm reviewing (well more like recommending) the film The Breakfast Club, so please keep reading and hopefully you'll go watch this classic after (because you really should)

~ Review ~
For any teenager, a good film is like gold dust. One of my absolute favourite films is The Breakfast Club, an iconic 80's classic, perfectly executing the demands of the teenager years. If anyone is a lover of classics like me, then this film is a must see.

Director, John Hughes, works with one of the most memorable casts. The film starts at a Saturday detention, where 5 students from the most diverse of cliques must endure each other's company for several hours. The moral of the film makes it easy to note this as an absolute classic. For many teenagers it is easy to relate to the each and every character, as it highlights the pressure piled on by society, which ultimately pushes teens into stereotypes, most of which are not always necessarily a true reflection of that person at heart. 

Hughes captures raw emotion at the heart of every teenager, there are moments of laughter, philosophy and tears. This combination shows every aspect of being a realistic teenager. If I could buy everyone a copy of this film, I would, because everybody should watch this film and understand that what people want you to be, cannot and should not define you. It is one of the many "coming of age" films which sets the record straight. I've watched this film many of times and never do I grow old of it.

I hope that this post makes one person watch it at the least, as it truly is a film worth making time for. If you have seen this film or are looking for films from this sort of genre, my other recommendations are:
- Ferris Bueller's Day Off
- Say Anything 
- Pretty In Pink
- Sixteen Candles 
- Weird Science
- Can't Buy Me Love 

Thank you for reading, I hope this was in some way helpful. Also, good luck to those doing taking their exams this month and next :-) 

Follow me on:
Instagram - @perksofgemma_
Twitter - @Gemm96
I promise to follow back :-) 

Friday, 25 April 2014

DIY: Studded iPhone cases

For ages now, I have been after a studded phone case and looking on ebay they can be a bit pricey, so to cut costs, I thought I would do it myself. In this blog I'm going to go through how I made my very own studded phone case.


For this simple little project, you will need:
- A silicone case (I brought mine from Primark for £1 each, but these can be found elsewhere)
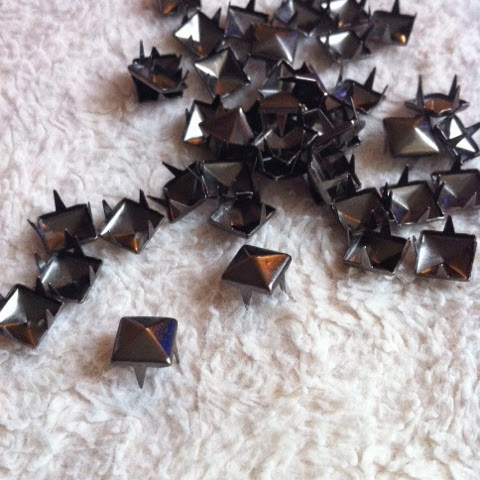
- Studs (I purchased mine from eBay, a range of sizes can be found)


Just to be sure, I began by testing out the ways in which I would place the studs, as it's hard to go back once you've secured the stud. 


Once deciding the way I wanted the case to look, you simply push the stud through the silicone, as seen in the picture below.


To secure the stud, there is no mess, no bother, you just simply push the spikes inwards (as seen below) as the studs are hollow you can push the spikes fairly far in to ensure they do not scratch the back of your phone. 


Just keep the process going and soon enough you'll have a studded phone case. The beauty of doing it yourself means you can change the style and make it unique. As you can see, from the ones in which I made, there are many different ways to create your own studded phone case. 


I hope this little tutorial was helpful for anyone looking for a DIY project. Leave any comments if you have any questions, I'll be happy to answer :-)

Follow me on:
Instagram - @perksofgemma_ 
Twitter - @Gemm96
I promise to follow back :-)

Saturday, 19 April 2014

Dye time

Hello again :-) So, as previously mentioned in my Beauty Favourites post, I am in the process of dying my hair from light brown to dark blonde. In this post I'm going to tell you about the hair dyes which I have used and which brand I would recommend the most.

L'Oreal Wild Ombrés
At a young age, I was quite the goldilocks, it wasn't till I was about 3 when my hair started to naturally change colour, as I've grown up it has continued to be a light brown colour with some natural highlights. However, last January I felt like a bit of change was needed, so I decided to ombré my hair. At first I was quite nervous, because I had never dyed my hair before so it was quite a daunting process for me, especially when it involved bleach. To ombré my hair, I purchased the L'Oreal Wild Ombrés kit in the shade No2, a kit I would very much recommend as there are several colours to match your hair too. The kit itself comes with a brush to comb the product through the ends of your hair, a tool which made the process so much easier. This product was fabulous and fit it's purpose, despite the undeniably strong smell of bleach. After a couple of months I grew tired of the blonde ends, which had actually started to fade and sometimes resembled a ginger colour rather than blonde in pictures. As I didn't want to just cut my ends off, I allowed my hair to grow and progressively had my ends chopped off. However, I would strongly recommend this kit for anyone looking to ombré their hair and if you are to keep with the colour, it may well be a good idea to go over your
ombré again.

L'Oreal Sublime Mousse
Some of the still blonde remained after many haircuts and as I grew more tired of it, I felt that it would just be easier to dye all of my hair. So I opted for a similar colour to my natural hair colour, to do this I used L'Oreal Sublime Mousse in the colour Very Light Brown. Quick and easy to apply with very little mess, definitely a product I would recommend as the colour took well. When my roots started to show I chose to dye my hair again with the colour Radiant Golden Brown, again a colour by L'Oreal Sublime Mousse. This colour had an amazing tone to it and I was very happy with the life it brought to my hair colour. Like the Wild Ombré Kit, it had a strong smell, however the fact that it was not messy and stressful completely made up for the overwhelming smell. The brilliant things about these kits are not only do they have a wide range of colours, but they also come with a conditioner, which I can honestly say works wonders on your hair after it has been dyed and becomes dried out. 

John Frieda Precision Foam
Most recently, I have been in the process of dying my hair from a light brown to dark blonde, to achieve this I purchased John Frieda Precision Foam in the colour Natural Dark Blonde, however, due to the colour already on my hair it means I still have to keep working on getting it to my desired colour. Nevertheless, John Frieda products are amazing, they take so well and the smell of hair dye does not last for a couple of days unlike the previous products mentioned. Alike to L'Oreal hair dyes, the John Frieda hair dye kits come with a conditioner too, I found that I personally preferred the conditioner in the L'Oreal kits to the John Frieda kit, however it still did it's job of locking in the colour. This hair dye took well to my hair and despite the length and thickness of my hair, I, personally, only needed one bottle to cover all my hair. Although, in some shops this product is expensive it is well worth it's money as it is so quick and easy to apply, this product can be found on offer throughout the year, so it is always good to look out for an offer.

My verdict
In my opinion and from my experience, I've found that mousse hair dyes take better to your hair, as it soaks in making sure all hair is covered and coloured. Out of L'Oreal Sublime Mousse and John Frieda Precision Foam, I would recommend John Frieda, as there is less of an overwhelming smell and there is quite a large range of colours to choose from. A top tip which my mum told me for when dying hair is "when finished applying hair dye, make sure you're in a warm room and put a plastic bag over your hair in order to keep the hair dye warm". I would also recommend that after dying your hair, you take good care of it's condition, as it will become dry and look damaged, by applying something like Moroccan oil or Argon oil can bring back life to dead ends *check out my previous blog post 'Beauty Favourites' where I review Pantene's Argon Oil*

I hope this review of the hair dyes, which I have used, is helpful to others. If you have any questions please feel free to leave them in the comment section below and I will answer them. Thank you for reading and Happy Easter to everyone :-)

Follow me on:
Instagram - @perksofgemma_
Twitter - @Gemm96
I promise to follow back ♡

Thursday, 17 April 2014

Getting ready for exams

Well, this week has been a very hard week for me, as my study leave period begins in preparation for my final exams. So daunting and quite a bit emotional, I cried in our last assembly, oops.

It's been a tough week, mostly because I now have to find a way to divide my time in a way which will be most beneficial to me and prepare me best for my exams in May. I know many people are going to be going through similar issues at the moment, so in this post I will include some of my top tips to try and help those who may be struggling to find a technique which works. 

Tip number 1:
- Begin by writing down any deadlines and the order in which you will doing your exams, this will be useful as a daily reminder of what you will be expecting during exam session and what you may need to focus your revision on, in terms of what exam is first.

Tip number 2:
- Attend any extra revision classes which your school may put in place, during your own study leave. If they are not, why not try setting up your own revision session with your friends, here you can exchange notes, things to expect in the exams, be reminded of key themes/people/events which you may have forgotten. 

Tip number 3:
- Make up your own exam questions. Sometimes it is good to think like an examiner, as they will be marking your answers with a certain expectation, it is good to understand the mark scheme and where you can also pick up easy marks.

Tip number 4:
- Make a revision timetable, day by day. Make sure on this timetable you do not exceed long times of revising and give yourself regular breaks. There is nothing worse than sitting and staring at a book with nothing going in, because you haven't moved from the same spot in 3 hours. 

Tip number 5:
- It may look like clutter, but revision notes on posters are a good way to be constantly reminded of important information. For instance, when I was revising for my GCSE History exam, I felt that dates/years were not my strongest subject, so I created a timeline which went along my wall, so every time I looked up I would see that information.

Tip number 6:
- It's important to take time out for yourself. When you know you have hit the point of no information going in, cool it for a couple of hours, watch a film and let your brain relax. You will find once you go back to your revision you will feel more refreshed and ready to pick up where you left. 

Tip number 7:
- Reward yourself, only you can set your own goals. It's important recognise in yourself how far you've come.

I hope this has been useful, thank you for reading and good luck to those with their exams soon :-) 

Follow me on:
Instagram - @perksofgemma_
Twitter - @Gemm96
I promise to follow back ♡